TESL Academy: How to play around and effectively use Runes and Prophecies

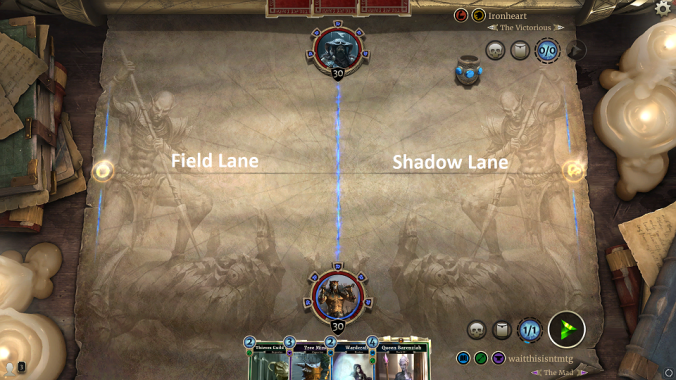
Hey Everybody! WaitThisIsntMTG back again with some tips for improving play. Last time we discussed lanes, today we’re going to discuss Runes and Prophecies, which are the other major defining characteristic of The Elder Scrolls: Legends (TESL).

To cover the basics, every player starts the game with 30 health, and 5 unbroken runes. Every 5 health you lose, one of your runes breaks. Whenever a rune is broken you draw a card, and if that card has prophecy, you may play it for free, whether it’s your turn or your opponents turn! For more details, check out Team Rankstar’s New Player Guide.

An important thing to think about when deciding to break an opponent’s runes is your role in the matchup. This is something I touched on briefly last article, and I will again here as it is very important. If you believe your opponent will outvalue you late in the game, you have to play the aggressive role, which means taking the initiative on the board and being more willing to break their runes. If you think your opponent won’t be able to outvalue you late game, you will assume the control role, which in this context means not breaking runes until you have board control and can kill in 1 or 2 turns.

Image result for cloudrest illusionist

How to play around prophecies:

It’s impossible to always play around every prophecy, but there are several things you can do to minimize the impact a prophecy will have. Please note that there are situations where you don’t want to necessarily follow all of these rules! These are meant to be general guidelines. If you feel you have a line of play that doesn’t follow one of these rules but is best for the situation, then go for it!

  • Always try to follow this turn order:
    1. Draw cards, because it may impact the way you attack and play other cards that turn.
    2. Play any tricks to help your creatures trade more effectively/boost damage. Things like: Wardcrafter; Cloudrest Illusionist; Orc Clan Captain; etc.
    3. Attack your opponent’s creatures so you can make trades without a prophecy getting in the way. Always be wary of your creatures with breakthrough, they can end up breaking runes unexpectedly (I can’t even tell you how many times I’ve done this) so make sure you trade first.
    4. Attack your opponent and break runes.
    5. Play any other cards you want to.
  • Keep in mind the prophecies your opponent could play and seek to minimize their effects. There will be a list of the most common prophecies of each color later in the article.
  • Skip Runes – if you have a creature with 6+ power while your opponent has only 6 life left, you can attack them, killing them before they will get the opportunity to have a prophecy. You can also do this at 11, 16, 21, and 26 health, but having a creature large enough to do that is less common. You should try to line up your opponent’s health such that you have the ability to do this. For example, let’s say your opponent is at 12 life and you have 3 creatures, a 5 power creature, a 7 power creature, and a 4 power creature. You want to break the 10 life rune with the 5 power creature, and then kill them with your 7 power creature, avoiding the final rune. This order also means if your opponent gets a prophecy to stop you on the ten life rune, they will not also get the additional card from the 5 life rune breaking.

Things to consider as the aggressor breaking runes:

  • Attack with creatures that won’t break runes first when you are trying to push damage. For example, your opponent has 30 health and you have 4 creatures able to attack: 2 of them have 2 attack, 1 has 4 attack, and the last one has 5 attack. Excluding any other effects, you should attack with the 5 power creature, then the 4 power creature, then both the 2 power creatures. This way, if your opponent gets a prophecy like cast out, piercing javelin, or lightning bolt on their first rune, they will only have your small targets to hit that will stop an attack and will have to choose between using their prophecy on your best creature (the 5 power) or one which can still attack.
  • Similar to #1, you want to have attacked with your most important creatures prior to breaking any runes, as to incentivize your opponent to use any prophecies on your less valuable creatures. This means creatures like goblin skulk, withered hand cultist, ulfric’s housecarl, and others that you may lean on to get more cards or help keep a strong board presence, should attack before you break runes.

Things to consider as control breaking runes:

  • DON’T BREAK RUNES until you have board control. This is the most important thing as a control player. It is vital that you maximize your ability to gain card advantage over your more aggressive opponent as this will be extremely helpful in swinging the game back in your favor in the later part of the game when your opponent has slowed down. If you break a rune, even if they don’t get a prophecy them drawing a card means more things for them to play the following turn. It may seem promising to try to outrace your opponent, but don’t go for this unless you are very confident it will work.
  • Once you have board control, you want to build up your board such that you will be able to kill your opponent in one or two turns. If you are at a very low life total, try to gain some life before you start breaking their runes, that way if they stop your kill attempt or pull a prophecy like lightning bolt they won’t be able to kill you the turn after.
  • If you don’t have enough damage to kill them in one turn, try to minimize how much you do on the first turn to avoid them being able to make a comeback.

How to Effectively use prophecies:

As the aggressor: You want to use your prophecies to help strengthen your board or protect your most valuable threats. A creature with guard should be used to protect other creatures your opponent may try to trade with. You may not always want to use a prophecy, like if you pull a lightning bolt off a prophecy early in the game that won’t help you finish your opponent or kill a valuable creature.

As the control: You want to use your prophecies to slow your opponent as effectively as possible. This means trying to use guards that can remove their threats, not just stop them for a single attack, and using effects like Shrieking Harpy or Piercing Javelin to stop their largest threats. You will sometimes face a situation where you will have to choose between killing their best threat that cannot attack or another creature that can. In general, if you have a lot of life still, you should kill the more valuable threat that cannot attack. If you are low on life, you should kill the one that can still attack if it can put you too close to death. The exact specifics of what you should do depends on what you are using in your deck and should be considered case-by-case.

The most common prophecies you will face, by attribute:

Strength (Red)

File:LG-card-Circle Initiate.png

Circle Initiate – Look out for this card in any red aggressive list and many red midrange lists. It can’t stop things on your turn, but it can put a pretty impressive 4/3 threat on their side if they can break one of your runes.

File:LG-card-Graystone Ravager.png

Graystone Ravager – This will generally only be in very aggressive lists, as the stats make for very poor trades and can be killed very easily. Often used in prophecy Battlemage or orc decks.

File:LG-card-Protector of the Innocent.png

Protector of the Innocent – A solid two-drop, it can slow you down because of its guard, but its 2 health makes it very vulnerable to removal or cheap creature trading with it.

File:LG-card-Morkul Gatekeeper.png

Morkul Gatekeeper- Again look out for this in red aggressive and midrange lists. Its guard can get in the way of your attacks and its effect can be used to boost either one of their other creatures to push damage or itself to enable a trade.

Intelligence (Blue)

File:LG-card-Shrieking Harpy.png

Shrieking Harpy – Played in most Intelligence decks, especially midrange and control decks, this can stop a lethal attack in its tracks by shackling the most powerful creature.

File:LG-card-Camlorn Sentinel.png

Camlorn Sentinel – Pretty much only played in prophecy-focused decks like prophecy Battlemage, as its low power makes it ineffective for trading with many minions, but it can be helpful for slowing an aggressive opponent.

File:LG-card-Lightning Bolt.png

Lightning Bolt – Played in 99% of Intelligence decks, this is one of the most defining cards in the game. It can be used as removal for an opposing creature, or to kill your opponent, so always be wary of breaking runes when at 4 or less health.

File:LG-card-Mystic Dragon.png

Mystic Dragon – Most common in blue midrange lists, this card can be game breaking if prophesied out early or when things are close.

File:LG-card-Fate Weaver.png

Fate Weaver – Very powerful in prophecy heavy decks, again like prophecy Battlemage, and can cause huge swings in the board when pulled off prophecy.

Willpower (Yellow)

File:LG-card-Cleric of Kyne.png

Cleric of Kyne – Most commonly played in midrange mage decks as they have few good two drops, and this can trade effectively with most other two drops. It’s summon effect can have an impact on trades.

File:LG-card-Cloudrest Illusionist.png

Cloudrest Illusionist – A very powerful card often played in tokens and other midrange decks with Willpower. Its effect enables very effective trades and can stop an attacker for 4 damage.

File:LG-card-Knight of the Hour.png

Knight of the Hour – Most common in slow control decks, though has lost much of its popularity recently. Can stop an aggressor in their tracks and gain a bit of life back, but played from hand is quite lackluster.

File:LG-card-Piercing Javelin.png

Piercing Javelin – Played in most willpower midrange decks and almost all willpower control decks, can stop an attack and will usually remove the best creature or biggest threat. Always be wary of this card from a willpower opponent.

Agility (Green)

File:LG-card-Daring Cutpurse.png

Daring Cutpurse – Occasionally found in agility midrange or aggressive decks, this card can snowball into a very large threat if left unanswered.

File:LG-card-Fighters Guild Recruit.png

Fighters Guild Recruit – Found in most agility control and many agility midrange decks, this is a nightmare for most opponents hoping to attack or make even trades, forces trades or an answer and the trades will often favor the player with the recruit.

File:LG-card-Gloomlurker.png

Gloomlurker – Hides a creature for a turn, great card for tempo-focused lists like Tempo Assassin, but can be easily traded with if not protected.

File:LG-card-Blacksap Protector.png

Blacksap Protector – Occasionally found in midrange agility decks, it can help protect your threats or slow an aggressor if prophesied, and is a decent play on curve from hand.

File:LG-card-Brotherhood Slayer.png

Brotherhood Slayer – This won’t mess with your plays when prophesied but is a solid play from hand as it has decent stats and a solid slay ability. Usually found in midrange agility lists.

File:LG-card-Moonlight Werebat.png

Moonlight Werebat – Found in some agility midrange or control lists, especially unstoppable rage decks, this card can help swing a match if prophesied early, but won’t have an immediate impact on attacks.

Endurance (Purple)

File:LG-card-Mummify.png

Mummify – Found in Endurance control decks, can shrink a powerful or valuable creature. Can slow an attack if you are building an individual large threat, but is not too effective vs a board with many small creatures.

File:LG-card-Midnight Sweep.png

Midnight Sweep – Found in Endurance token decks, can slow an attack but is easily traded with.

Multi-Attribute

File:LG-card-Tyr.png

Tyr – The only Multi-attribute prophecy, is sometimes played in crusader midrange or control decks. It can slow an attack but is not very common.

Neutral

File:LG-card-Lurking Crocodile.png

Lurking Crocodile – Most commonly played in prophecy heavy decks, this cannot stop an attack but can allow trades in their favor or build their board more.

File:LG-card-Dark Harvester.png

Dark Harvester – Generally only played in control decks, can really hurt an attack as it has got decent health and gains you 4 health. Not very common but keep in mind when facing very slow, prophecy filled decks.

That’s all for today! I hope you learned some new ways to outplay your opponent, now go claim victory!

Victory

**Shoutout to UESP for the amazing card images!

TESL Academy: How to Effectively use Lanes

Hi everybody! WaitThisIsntMTG back again with some more tips for newbies. Today we are going to focus a bit deeper into the theory of the game itself, in the form of discussing how to use lanes adeptly. I won’t go through every possible scenario, as this is meant to focus on the theory at a high level. To gain even deeper knowledge of this, watch some of the community’s high legend players on twitch and ask questions about their plays! The streamers we have tend to be very forthcoming about their strategies, and are how I learned most of what I know today! If you have differing opinions on anything I cover, feel free to leave a comment!

Lanes are one of the biggest differentiators of Legends from Hearthstone, but at a quick glance it seems like there is little to it. Despite how simple they appear at first glance, there are huge implications to playing creatures in the correct lane, and playing in the wrong lane at the wrong time can lose you lots of games.

Before we get started, I want to touch on a topic which can help some of these decisions involving lanes: understanding roles. In a game like TESL, a deck’s role is what it plays as in a specific match. When playing a very aggressive deck vs a very slow deck, these are obvious, the aggressive deck is the aggressor. But, what about when two control or aggressive decks face? In order to understand your deck’s role, you’ll need to know the commonly used cards in the game and what popular decks tend to play like, but once you do, it will improve your winrates. To keep it brief, in these archetype mirrors, if you make the decision your deck has less late game value, you’ll want to start being the aggressor, and vice versa. This is a really simple explanation of this, and there is a lot of nuance to understanding deck roles. If you want to explore this further, I’d recommend looking into MTG articles on the subject.

Now onto the topic at hand!

Lanes labled

As the Aggressor:

Let’s start with the most common mistake I see new players mistake: As the aggressor, facing a totally empty board and playing their creatures into the shadow (right) lane. Don’t get me wrong, there are times this is correct, like when you have an early game goblin skulk when facing a deck with cheap charge or ward creatures. However, in general, you always want to take the field (left) lane when there is an empty board. The primary reason for this is that whoever can establish a presence on the field lane first has a huge edge in controlling it because they’ll almost always be choosing how trades happen. A simple example can help illuminate exactly what I mean:

Let’s say we’re playing Midrange Sorcerer on the ring vs a tribunal control opponent. Your hand consists of Windkeep Spellsword, Young Mammoth, Wardcrafter, and Firebolt. Your opponent does not play anything their turn 1 and passed to you. If you play the Windkeep Spellsword field lane, your opponent now needs to either play a spell to kill it or play a creature in hopes of it trading evenly. Let’s say they play Wardcrafter to contest it, warding itself, and pass back to you. Since you played field lane, we get to have your turn be firebolt their wardcrafter, hit it with Windkeep Spellsword, and play Wardcrafter re-warding your Windkeep Spellsword, giving you a big advantage in the early game. Had you played Windkeep Spellsword shadow initially, you would be unable to do this, and your opponent would get to decide how windkeep and wardcrafter fight when it goes back to their turn, which is not in your favor.

As Control: You still very much want to fight for the field lane as control. The reason for this is that as the game progresses, if your opponent is forced to play shadow lane, it a) stops them from being able to effectively split lanes; and b) lets your counter plays have a higher chance of attacking and getting their effects. I will elaborate on splitting lanes next, but to elaborate on counter plays, let’s use another example.

Let’s say you’re playing Tribunal Control, and your opponent is playing Aggro Hlaalu. It’s your turn 5, you’re at 23 life with 4 cards, Shadowfen Preist, Piercing Javelin, Firebolt, and Dawns Wrath, in hand, and your opponent has a haunted manor out. You just cleared your opponents couple of early game field lane plays, and still have a hive defender with 4 health there. They just played a Thieves’ Guild Recruit and an Eastmarch Crusader in the shadow lane triggering Haunted Manor on the Eastmarch Crusader, and passing the turn. Now you’ll get to play your priest destroying the manor, and threatening the pumped Eastmarch Crusader. You’ll have to take a bit of damage on the next turn, but come your turn 6 you’ll be able to Piercing Javelin/Firebolt their turn 6 play, trade your Shadowfen Priest with their Eastmarch Crusader, and leave them with likely just 1 attack on the field, basically killing all their tempo. Then as they rebuild their board over turns 7 and 8, still forced into the shadow lane, you’ll be able to play your dawns wrath and clear their board, which will often win you the game if they are out of cards.

Splitting lanes: This is an important thing to keep in mind as the aggressor in a matchup, especially versus any willpower-based or strength-based control deck, as well as decks based upon Doomcrag Vampire. Splitting lanes refers to having creatures in both lanes. There are several reasons to do this as the aggressor, but in general it is to not fall prey to AOE like Dawns Wrath, Unstoppable Rage or Cradlecrush Giant. The key to effectively splitting lanes is to be sure that both lanes are threatening. This puts your opponent in a “damned if you do, damned if you don’t” situation. If they clear one lane, you’ll still have huge tempo in the other, minimizing the impact their play had on your gameplan. Versus Willpower decks you’ll want to be especially careful of this as you approach 8 Magicka for Dawn’s Wrath, and versus Strength decks you’ll want to be careful of this at 6 mana for Cradlecrush Giant, and at 8 Magicka, if they have a lethal or powerful creature on board, be wary of unstoppable rage.

When to use the shadow lane: 

  1. Making a comeback: If your opponent has taken over the field lane, but both your life and your opponents are still high, if you’re the aggressor, you can put a large threat into the shadow lane, threatening a race or forcing an answer from your opponent. This will often give you a chance to retake the field lane after they’ve begun focusing on answering your threats in the shadow lane. If they go for a race, you will want to be sure you can push damage through their guards or other effects to slow your attacks, as well as use guards to slow their attacks. If you’re the control deck in the match, you don’t want to do this except for to protect a very valuable creature, as your opponent will gladly accept the race and probably have an advantage.
  2. Finishing off your opponent: If you’re the aggressor, and your opponent has put a barrier in the field lane that would take too much to break through, but you were able to weaken them heavily, often playing several threatening creatures in the shadow lane will help you push the final damage.
  3. Protecting valuable creatures: If you have a creature which your current strategy relies upon, say Goblin Skulk or Markath Bannerman, you can play them in the shadow lane to give them extra protection if your opponent is able to contest the creature with either creatures already there or charge creatures.

In Summary:

  1. Play into the field lane whenever possible, and especially on an empty board
  2. When you’re the aggressor, always be aware of AOE which can kill your creatures there.
  3. Use the Shadow lane to make a comeback, finish your opponent, or protect valuable creatures, otherwise fight for the field lane!

**There are situations where you won’t want to follow these rules, but they will be a good base knowledge of what to do.

That wraps up todays lesson, I hope you found this informative! Now armed with your new tools, go crush your opponents!

Victory


Use the code “TRS12” to get 12% off your order at InkedGaming.com and support Team Rankstar directly!


TESL Academy – How to effectively spend money in The Elder Scrolls: Legends

Hi Everybody! My name is Ethan, but you may have seen me on Reddit or in game as WaitThisIsntMTG. I’m not a top ranked player like the majority of Team Rankstar, but, as I’m going to focus on content for newbies, I don’t think I need to be to have good advice. I’ve played card games for close to a decade (can you guess what I started with? ;)), and I am an Administrator for The Elder Scrolls: Legends Facebook group. This gives me a lot of experience in the things some of our newest players need advice on, so I wanted to write some articles on topics I hope will help new players along their journey through TESL.

Today’s topic is going to cover the best ways to spend money in TESL, with the goal being to maximize the growth of your collection through smart purchases. TESL is a very generous game when going free to play. However, as a new player, it can be helpful to spend some money to boost your collection quickly if there are decks you want to explore or if you want to compete at the highest levels as quickly as possible. I am going to break down the best choices for various budget options, and try to explain the reasoning as best as possible, as well as how much you could expect your decks/collection to benefit from the purchase. It’s worth noting that these are my personal opinion, and at the end of the day, you should spend your money in the ways you feel will most help you have fun. It is a game after all!

File:LG-cardart-Orvas' Bargain.png

***If you are in a country besides the U.S.A., it would be most advantageous of you to make your money purchases on an Android or IOS device, as it forces the game to use your local exchange rate. If you do not do this, they will, for example, charge 19.99 Euros for 19.99 American dollars of content. I don’t know why it’s this way, but for now it is.

First, some general tips about spending money in the game:

  • Stories and collections are generally the best value for your money, as you are guaranteed entirely new cards that you couldn’t get without getting those stories with either gold or money.
  • If you purchase a story with money, you will get the cardback associated with that story. As of this writing, there is no longer any other way to get those cardbacks, so if you are the type of person who will want every cardback, it may be worth buying it with money.
  • When buying packs with cash, be sure to buy a bundle that includes a premium legendary if you can afford it (40 or 60 pack bundles). The reason for this is that if you are looking for a specific legendary from that set, having a guaranteed premium legendary means you’ll be able to destroy that premium card to create any legendary you want!
  • When seeking a specific card, especially a legendary, via pack opening, make sure not to craft it until you have finished opening packs for the time being, as it would be tragic to craft something and then pull it from a pack.
  • DO NOT BUY PUZZLES!! When building your collection, these are the lowest value option available. If you’re the type who cares more about cardbacks and titles, feel free, but for those trying to build a good collection quickly, these are not good value.


$5 Budget: The core starter set is incredible value, and will get you a nice boost of cards from what is largely considered the best set, and what is undeniably the largest set in the game. It’s impossible to guarantee that this helps you further the decks you enjoy, as you won’t know whats in the packs. Any of the other budgets with story and collection options will open a wider variety of deck choices for you, but if you just want to put a few dollars in, get the title and a couple random legendaries, it is great value.

$8 Budget: Any one Morrowind Pre-made Deck. None of these decks are amazing on ladder, but they do all have some solid cards that you’ll likely want in your collection. When combined intelligently with the other cards you will have starting out, this should help you build a solid first deck.

$20 Budget: This time the Dark Brotherhood Story. This goes to the story as stories are the most economical way to spend your money. The reason for this is you are guaranteed every single one of the cards in the story, rather than taking a chance on what you could pull from packs. This story will help you in gathering the basics for a variety of decks available. You also get the cardback related to any story you buy in full with cash, so if that matters to you, you should definitely pick the stories up with cash as there is no longer any other way to get those cardbacks.

$30 Budget Here I would go for Forgotten Hero Collection and the Dark Brotherhood Story. Both are sets which have many competitively viable cards, and it will guarantee you get all the cards from them. You could, instead of the Forgotten Hero Collection, get two starter packs(I’d recommend Core and Skyrim). However, it is more of a risk. After this purchase you would be able to give most decks a good few upgrades.

$50 Budget: I would get the Dark Brotherhood Story, Clockwork City Story, and the Forgotten Hero Collection. This guarantees you get the exact cards available and can’t get a bad set of packs. This option gets you all of the items I would consider “must buy” (whether with gold or cash) outside of packs, and would help you have the basics for most decks in the meta. This is a great starting platform someone who wants to cut a lot of the grinding out and start being competitive quickly.

$70 Budget: For this budget, I would get the Dark Brotherhood Story, Clockwork City Story, Forgotten Hero Collection, Madhouse Collection, and all three Starter Packs (Core, Skyrim, and Morrowind). This gets you every single pre-set collection of cards, and will give a solid boost to each of the pack-based expansions. After this purchase I would expect to have the basics for most decks, with one or two decks only missing a few legendaries you may want to improve the deck.

$110 Budget: I would get the entire $70 budget pack, as well as a $20 pack set for each Core and Skyrim. Core is the largest set by a longshot, and has some of the best cards in the game, and Skyrim has lots of constructed playables. This gets you a guaranteed additional legendary for each set, and would likely bring you to a point where you can build a deck almost card for card from their tier list, as you’ll have a solid amount of Soul gems after opening all those packs. You could instead purchase all of the Morrowind decks for a guaranteed 5 legendaries and the included rares and epics, as they all have good value. 

$320 Budget: This is the “Whale” option. If you’re the type of person who wants to be able to play any deck, and wants to do so immediately with little to no grinding, this is where you’ll want to be. You would start by buying the package for the $70 budget, then also buy a 60 pack bundle for each set (Core, Skyrim, and Morrowind), and all 5 Morrowind Pre-made decks. This would get you everything with guaranteed cards, enough packs to get you almost all commons and rares in each set, many epics, as well as 14 guaranteed legendaries, 6 of which will be premium (and that doesn’t even include what will be in the packs)!


That’s all for today! I hope you find this article helpful, and if you have anything you’d like to see an article on, feel free to message me on Reddit as Waitthisisntmtg. Thanks for reading! Now go slay your opponents!

Image result for TESL card art with gold

Use the code “TRS12” to get 12% off your order at InkedGaming.com and support Team Rankstar directly!